路線変更します(ごめんなさい)Kotlin推しへ
お久しぶりです。
職場復帰してしまいました。もう無理だよ。仕事できない人が仕事復帰しちゃダメだよ。辛い。
ってもう仕事の愚痴言い出したらここの記事が真っ黒に埋まるし誰得状態なのでここでストップ。
とりあえず世の中の子育てしながら働いているママに畏敬の念を。(;´Д`)
まず、ごめんなさい。Rubyでの勉強はここでストップします。
会社で主に使われているRubyでWebアプリ作ってみて職場での浮いた感じを取り除きたいと始まった今回の勉強。
会社で一大プロジェクトが始まり、それを何とJavaで作るという…
あれ、Rubyどこ行った。
そしてJavaじゃなくて、Java VM上で動く「Kotlin」なるものになるかもしれぬという動き…
うご…き…その動きにおばちゃん付いていけない。
何だよKotlin。ことりんって。笑顔が可愛い17歳vみんなのアイドルことりんでーすvみたいな名前、何だよ。
GoogleのAndroidチームが正式にサポートすることを発表したんですって。
やべえKotlin推しが増えてるんだ…
なので私もこれからKotlin推しになります!!ごめんなさい!!!
Kotlinのいいところ
とりあえず外注の方にいろいろ教えてもらったところ。
第一にJavaより煩わしくない。
・フィールド変数参照にgetterとsetterが不要
Javaならフィールド変数参照のときにgetterとsetterメソッドを介してましたが、Kotlinではそれが不要で直接参照できる。
あとはメモったノート忘れてきたのでまた追加します><
↑覚えとけよ
Railsアプリ作ってみました(indexページ作成編)
さてさてRuby on Railsに手を出していきましょう\(^o^)/
Ruby on Railsについての参照リンク
コマンドについて
ファイル構成について
indexの作成
まずはindexページを作ってみる。
Rails入門 | Rails日本語ドキュメント | Ruby STUDIO
Rails + Unicorn + Nginx でサーバを構築する - Qiita
Rails generate の使い方とコントローラーやモデルの命名規則 - Qiita
【Rails入門】controllerの使い方まとめ | 侍エンジニア塾ブログ | プログラミング入門者向け学習情報サイト
今回はモデルなどは不要なので、コントローラーなど(コントローラ・ビュー・アセット・ルート・テスト・ヘルパー)を作成する。
$ cd /var/www/rails/branches
$ rbenv exec bundle exec rails g controller Welcomes index
create app/controllers/welcomes_controller.rb
route get 'welcomes/index'
invoke erb
create app/views/welcomes
create app/views/welcomes/index.html.erb
invoke test_unit
create test/controllers/welcomes_controller_test.rb
invoke helper
create app/helpers/welcomes_helper.rb
invoke test_unit
invoke assets
invoke coffee
create app/assets/javascripts/welcomes.coffee
invoke scss
create app/assets/stylesheets/welcomes.scss
ルートの設定ファイルconfig/routes.rbを編集して、上記で作成したapp/views/welcomes/index.html.erbがindexページとして表示されるようにする。
$ vim config/routes.rb
内容
Rails.application.routes.draw do
root :to => 'welcomes#index' #これだけ追加
get 'welcomes/index'
# For details on the DSL available within this file, see http://guides.rubyonrails.org/routing.html
end
確認
$ rbenv exec bundle exec rake routes
Prefix Verb URI Pattern Controller#Action
root GET / welcomes#index
welcomes_index GET /welcomes/index(.:format) welcomes#index
ブラウザでhttp://IPアドレスを見たとき、未だにpublic/index.htmlが表示されている…
http://IPアドレス:3000であれば

エラーログの確認
$ vim log/production.log
ActionView::Template::Error (The asset "application.css" is not present in the asset pipeline.):
production環境では勝手にcssやjsをコンパイルしてくれないから、プリコンパイルしないといけないらしい。
$ rbenv exec bundle exec rake assets:precompile RAILS_ENV=production
Yarn executable was not detected in the system.
Download Yarn at https://yarnpkg.com/en/docs/install
Yarnを入れろと。
ちなみにYarnとはnpmに代わるNode.jsのライブラリやパッケージを管理するパッケージマネージャのことで
npmはNode.jsと一緒にインストールされるらしく、そういえばNode.js入れてなかったっけ?とnpm調べてみたら
$ npm -v
3.10.10
入ってたわ…いつの間に…無学…
npmに代わるYarnなので、npmでインストールも出来るけどbrewでのインストールが推奨されているらしい。
でも余計なのいれたくなry
とりあえずnpmでインストールしてみるYarn。
$ sudo npm install -g yarn
-gでグローバル領域にインストールされる。
~/.bash_profileにPATHを通しておく。
$ echo 'export PATH="$HOME/.yarn/bin:$PATH"' >> ~/.bash_profile
$ source ~/.bash_profile
確認
$ yarn -v
1.5.1
Rails起動後、ブラウザでhttp://IPアドレス:3000を確認

表示された\(^o^)/
しかしNginx+Unicornを起動しているのだ…Rails起動はいらないのだ…
Nginxの設定ファイル見直し
$ sudo vim /etc/nginx/conf.d/branches.conf
内容
#root /var/www/rails/hogehoge/public;
root /var/www/rails/hogehoge;
再起動
$ sudo systemctl restart nginx
ブラウザでhttp://IPアドレスで確認

表示された\(^o^)/
参考にしたサイトがpublic指定してたもんだから、それ指定しててもconfig/routes.rbが優先されるもんだと勝手に思っていたよ…ホンマ理解足りてない( ;∀;)
いつも長いので、今回はこのへんで。
その他の参考リンク
調査段階で、後々読みたいと思っているリンクたち
ヘルパーとかテストとかいらんやんと思ったら
ちょっと分かりづらかったアセットパイプラインやマイグレーションについて
セキュリティについて
Railsアプリ作ってみました(初期編)
やっと…!やっとここまで…!
Railsアプリ作成
1.Railsプロジェクトを作成
Rails 5 + Unicorn + Nginx 環境構築メモ(自動起動設定も) - Qiita
【完全網羅】rails newの基礎からオプションまで(db, rspec) | 侍エンジニア塾ブログ | プログラミング入門者向け学習情報サイト
hogehogeはアプリ名を指定、「--skip-bundle」はbundleインストールをスキップ、「-d mysql」はDBをMySQLに指定。
$ rbenv exec bundle exec rails new hogehoge --skip-bundle -d mysql
Rails をローカルインストールするために使用した Bundler 環境を削除
$ ls -a
. .. hogehoge .bundle Gemfile Gemfile.lock vendor
$ rm -f Gemfile; rm -f Gemfile.lock; rm -rf .bundle; rm -rf vendor
$ ls -a
. .. hogehoge
綺麗になりました~
Railsアプリ環境に自動生成されているGemfile内に記述のあるrailsを含め、gemパッケージをbundlerでローカルインストールし直す。
$ cd hogehoge
$ sudo yum install mysql-devel
$ rbenv exec bundle install --path vendor/bundle
git管理ファイル.gitignoreに「vendor/bundle」を含めないように編集
$ echo '/vendor/bundle' >> .gitignore
確認
Railsサーバ起動
$ bundle exec rails server -e production
HTTPレスポンス確認
$ curl -I localhost:3000
HTTP/1.1 404 Not Found
Content-Type: text/html; charset=UTF-8
X-Request-Id: 14e2df0f-eccb-4f3c-b5f2-4481afd3e00f
X-Runtime: 0.036461
Content-Length: 1722
hogehoge/publicの下にindex.html作ってないからそりゃそうだ。
前記事「GCEで事前準備(SSHでサーバー接続するまで編)」を参考にGCPコンソールでポート番号3000を開ける。
そのままブラウザで確認。http://【VMインスタンス外部IP】:3000/

わあああああああああRubyっぽいの出たーーーーーーー!!!!
エラーなのに喜ぶ私…
ちなみに↑これはpublic/404.htmlの表示で、index.htmlがないから出てると思うんだけど、Rails4まではpublic/index.htmlが自動的に作成されていたんだって…
2.MySQLの設定
データベース設定の編集
database.ymlのデータベース設定を編集
$ cp ./config/database.yml ./config/database_180411.yml
$ vim ./config/database.yml
本番環境想定なので、「development:」から始まる開発環境セクションと「test:」から始まるテスト環境セクションをコメントアウト。
「production:」から始まる本番環境セクションに「host: 【VMインスタンスの外部IP】」を追記、「username: hogehoge_user」に変更する。
MySQLユーザの作成
上記ユーザhogehoge_userをMySQLに作成する。
$ mysql -u root -p
> CREATE USER 'hogehoge_user'@'localhost' IDENTIFIED BY '【MySQLパスワード】';
------------間違えとそれの取り消し------------------------------------------------------------------
> GRANT ALL PRIVILEGES ON database_name.* TO 'hogehoge_user'@'localhost';
> FLUSH PRIVILEGES;
間違えた…
> SHOW GRANTS FOR 'hogehoge_user'@'localhost';
> revoke ALL PRIVILEGES ON `database_name`.* from 'hogehoge_user'@'localhost';
--------------------------------------------------------------------------------------------------------------
> GRANT ALL PRIVILEGES ON *.* TO 'hogehoge_user'@'localhost';
> SHOW GRANTS FOR 'hogehoge_user'@'localhost';
> FLUSH PRIVILEGES;
環境変数の設定
環境変数に追加
以下を追記
export RAILS_ENV='production'
export RAILS_DATABASE_PASSWORD='【MySQLパスワード】'
.bash_profileを再読込
$ source ~/.bash_profile
3.Railsアプリのデータベース作成
database.ymlの内容でデータベースを作成
$ bundle exec rake db:create RAILS_ENV=production
(略)
rake aborted!
Bundler::GemRequireError: There was an error while trying to load the gem 'uglifier'.
Gem Load Error is: Could not find a JavaScript runtime. See https://github.com/rails/execjs for a list of available runtimes.
Backtrace for gem load error is:
/var/www/rails/hogehoge/vendor/bundle/ruby/2.5.0/gems/execjs-2.7.0/lib/execjs/runtimes.rb:58:in `autodetect'
(略)
あらららエラー…青字エラーで確認。
2個めの参照リンクでNode.jsが足りないとあるので、先にyumリポジトリにnodejsを追加(EPELのリポジトリを使用)
$ sudo yum install nodejs --enablerepo=epel
$ bundle exec rake db:create RAILS_ENV=production
#<Mysql2::Error: Can't connect to MySQL server on '【VMインスタンスの外部IP】' (110)>
Couldn't create database for {"adapter"=>"mysql2", "encoding"=>"utf8", "pool"=>5,
(略)
Created database 'hogehoge_production'
エラーが変わった。MySQLに接続できない\(^o^)/外部IP指定しちゃだめなのか。
$ vim ./config/database.yml
「production:」から始まる本番環境セクションに「host: localhost」に変更
$ bundle exec rake db:create RAILS_ENV=production
Access denied for user 'hogehoge_user'@'localhost' (using password: NO)Please provide the root password for your MySQL installation
>
rootのパスワード入力するが、
Mysql2::Error: Your password does not satisfy the current policy requirements: GRANT ALL PRIVILEGES ON `hogehoge_production`.* TO 'hogehoge_user'@'localhost' IDENTIFIED BY '' WITH GRANT OPTION;
Couldn't create database for {"adapter"=>"mysql2", "encoding"=>"utf8", "pool"=>5, "username"=>"hogehoge_user", "password"=>nil, "socket"=>"/var/lib/mysql/mysql.sock", "database"=>"hogehoge_production", "host"=>"localhost"}
rake aborted!
(略)
まだエラー出る割に、MySQLでDB確認するとDB作成されてる…
青字はdatabase.ymlでpasswordが設定されていなかったら出るエラーらしい。
database.ymlを再度確認すると
password: <%= ENV['HOGEHOGE_DATABASE_PASSWORD'] %>
先程.bash_profileの環境変数には「RAILS_DATABASE_PASSWORD」を設定したわけだから、「RAILS_DATABASE_PASSWORD」で揃える。
$ bundle exec rake db:create RAILS_ENV=production
Database 'hogehoge_production' already exists
そりゃそうだ…気持ち悪いから作り直そう…
$ bundle exec rake db:migrate:reset RAILS_ENV=production
Dropped database 'hogehoge_production'
Created database 'hogehoge_production'
db/migrateディレクトリ内のファイルを使い、DBにテーブル作成
$ bundle exec rake db:migrate RAILS_ENV=production
> use hogehoge_production;
> show tables;
+-------------------------------+
| Tables_in_hogehoge_production |
+-------------------------------+
| ar_internal_metadata |
| schema_migrations |
+-------------------------------+
2 rows in set (0.00 sec)
4.Secret Key登録
Rails 5 + Unicorn + Nginx 環境構築メモ(自動起動設定も) - Qiita
Rails5.1をproduction環境で起動する際の秘密鍵設定 - Qiita
Rails が production 環境で真っ白、SECRET_KEY_BASE 設定忘れが原因でした | EasyRamble
RailsをProduction環境で起動するにはRails4.1から秘密鍵を設定しないといけないようです。
$ bundle exec rake secret
長い文字列が出てくるので、これを環境変数に設定する。
以下を追記(xxx部分を上記結果の長い文字列に)
export SECRET_KEY_BASE='xxx'
.bash_profileを再読込
source ~/.bash_profile
5.JavaScript Runtimeの有効
Unicorn入れようと思って調べたら、Rails起動するときエラーになるときあるのでtherubyracerインストールしとけって。
これ前記事でbundle exec rake db:create RAILS_ENV=production時に「There was an error while trying to load the gem 'uglifier'.」のエラーが出て、対応の一つであったけどbundle installで上手くいかなくて、yumリポジトリにnodejs追加したらrake db:create出来たから、まあいいかと放置してたやつだ…
$ cd hogehoge
$ vim Gemfile
以下のコメントアウトを外す
gem 'therubyracer', platforms: :ruby
therubyracerをbundle installするためにはg++が必要とのことなのでインストール
$ sudo yum install gcc-c++.x86_64
$ rbenv exec bundle install --path vendor/bundle
6.Unicornインストール
今回結局、ApacheじゃなくてNginx入れたので、Unicornの方がいいらしい。
なのでUnicon(RailsがApacheやNginxで動くためのアプリケーションサーバ)を入れていく。
Unicornのインストール
Gemfileの編集
$ cd hogehoge
$ vim Gemfile
以下を追記
gem 'unicorn'
bundleを使ってUnicornをインストール
$ rbenv exec bundle install --path vendor/bundle
configファイルの作成と編集
一度Unicorn設定および自動起動設定(/etc/init.d/)をしたけどエラーにハマり、結局database.ymlにパスワード直書きなら解決したけど、そりゃじゃ気持ち悪いので自動起動をRakeタスクに変更しました。変更前の紆余曲折を見たい方は↓どうぞ。
②CentOS7にRailsとUnicornとNginxをインストールして連携させる(あとMySQLも) - とりとめも
$ cd hogehoge/config
$ vim unicorn.rb
以下の内容を追記(基本はリンク①だが青字のみリンク③)
# Railsのルートパスを求める。(RAILS_ROOT/config/unicorn.rbに配置している場合。)
rails_root = File.expand_path('../../', __FILE__)
ENV['BUNDLE_GEMFILE'] = rails_root + "/Gemfile"
# Unicornのワーカー数
worker_processes 2
# Unicornの起動コマンドを実行するディレクトリを指定
working_directory rails_root
# 接続タイムアウト時間
timeout 30
# Unicornのエラーログと通常ログの位置の指定
stderr_path File.expand_path('../../log/unicorn_stderr.log', __FILE__)
stdout_path File.expand_path('../../log/unicorn_stdout.log', __FILE__)
# Nginxで使用
listen File.expand_path('../../tmp/sockets/unicorn.sock', __FILE__)
# とりあえず起動して動作確認をしたい場合は以下の設定を行う。
# listen 8080
# プロセスの停止などに必要なPIDファイルの保存先を指定
pid File.expand_path('../../tmp/pids/unicorn.pid', __FILE__)
# 基本的には`true`を指定する。Unicornの再起動時にダウンタイムなしで再起動が行われる。
preload_app true
# USR2シグナルを受けると古いプロセスを止める。
before_fork do |server, worker|
Signal.trap 'TERM' do
puts 'Unicorn master intercepting TERM and sending myself QUIT instead'
Process.kill 'QUIT', Process.pid
end
defined?(ActiveRecord::Base) and
ActiveRecord::Base.connection.disconnect!
end
after_fork do |server, worker|
Signal.trap 'TERM' do
puts 'Unicorn worker intercepting TERM and doing nothing. Wait for master to send QUIT'
end
defined?(ActiveRecord::Base) and
ActiveRecord::Base.establish_connection
end
自動起動の設定(/etc/init.d/unicornを新規作成)
$ cd /etc/init.d/
$ sudo vim unicorn
リンク③をそのまま追記
$ ls -al
total 44
(略)
-rw-r--r-- 1 root root 1420 Apr 11 23:11 unicorn
ファイル権限を変更
$ chmod 755 /etc/init.d/unicorn
$ ls -al
total 44
(略)
-rwxr-xr-x 1 root root 1420 Apr 11 23:11 unicorn
自動起動設定
$ sudo chkconfig unicorn on
Unicorn起動
$ sudo service unicorn start
start production
/etc/init.d/unicorn: line 32: bundle: command not found
おおう…
-------意味ない対応-----------------------------------------------------
$ which bundle
~/.rbenv/shims/bundle
$ bundle show unicorn
/var/www/rails/hogehoge/vendor/bundle/ruby/2.5.0/gems/unicorn-5.4.0
違うけど…
.bundle]$ rbenv exec gem install bundler
Successfully installed bundler-1.16.1
Parsing documentation for bundler-1.16.1
Done installing documentation for bundler after 5 seconds
1 gem installed
再度bundlerインストールしても結果は変わらず。
------------------------------------------------------------------------------
$ cd hogehoge
$ bundle exec unicorn_rails -c config/unicorn.rb -D -E production
これならエラーなく通る。自動起動がこれやるとダメなのか…
gemの情報表示
$ gem environment
RubyGems Environment:
- RUBYGEMS VERSION: 2.7.6
(略)
- EXECUTABLE DIRECTORY: /home/【ユーザ名】/.rbenv/versions/2.5.1/bin
(略)
$ echo $PATH
これに表示されるPATHにはEXECUTABLE DIRECTORY指定のディレクトリはなかった…だから通らなかったのか。
とりあえず/etc/init.d/unicornに直でPATH書いてしまう。
$ sudo vim /etc/init.d/unicorn
以下をコメント直下に追記
export PATH=/home/【ユーザ名】/.rbenv/versions/2.5.1/bin:$PATH
Unicornサービス起動
$ sudo service unicorn start
start production
master failed to start, check stderr log for details
エラーが変わった。
とりあえず全部上手く行ったら、PATHの直書きやめて、以下を参考に対応したい。
ログを確認。
$ view log/unicorn_stderr.log
すると以下のエラーが書いてあった。
ArgumentError: Already running on PID:12789 (or pid=/var/www/rails/hogehoge/tmp/pids/unicorn.pid is stale)
すでに起動していると出るみたい。そういえばさっき起動してた…( ;∀;)
Unicorn停止してから再度起動
$ sudo kill -QUIT `cat tmp/pids/unicorn.pid`
$ sudo service unicorn start
start production
master failed to start, check stderr log for details
またかよ~~~
$ view log/unicorn_stderr.log
今度のエラーはまた違う…
ERROR -- : Access denied for user 'hogehoge_user'@'localhost' (using password: NO) (Mysql2::Error)
DBパスワードの環境変数が上手く読み込めないことがあるみたい。
確かにdatabase.ymlでpassword直書きして「sudo service unicorn start」したらいけた…でも環境変数に戻したい。
また戻して、さらにdefaultセクションもuserおよびpasswordを直して再チャレンジ。
$ sudo service unicorn start
start production
master failed to start, check stderr log for details
またかよ~~~
$ view log/unicorn_stderr.log
(略)
E, [2018-04-12T02:34:24.933441 #14713] ERROR -- : adding listener failed addr=/var/www/rails/hogehoge/tmp/sockets/unicorn.sock (in use)
Errno::EADDRINUSE: Address already in use - connect(2) for /var/www/rails/hogehoge/tmp/sockets/unicorn.sock
(略)
今度また違うエラー…ソケットがもう使われてるって。
$ netstat -anp
↓結果
| Proto | RefCnt | Flags | Type | State | I-Node | PID/ Program name |
Path |
|---|---|---|---|---|---|---|---|
| unix | 2 | [ ACC ] | STREAM | LISTENING | 334765 | - | /var/www/ rails/hogehoge/ tmp/sockets/ unicorn.sock |
unicorn.sockが既に起動されてるからのエラーだと思う。
↓これを見直してみると、Nginxの設定してからsocketの設定(listen部分)した方がいいようだ…ああああ凡ミス…
以下の部分のコメントを逆に
# Nginxで使用
# listen File.expand_path('../../tmp/sockets/unicorn.sock', __FILE__)
# とりあえず起動して動作確認をしたい場合は以下の設定を行う。
listen 8080
再度Unicorn起動
$ sudo service unicorn start
start production
master failed to start, check stderr log for details
もう疲れたよ母ちゃん…( ;∀;)
$ view log/unicorn_stderr.log
(略)
ERROR -- : Access denied for user 'hogehoge_user'@'localhost' (using password: NO) (Mysql2::Error)
(略)
またお前かーーーーーーーーーーー
ちなみにRailsのコンソールで確認すると
$ rbenv exec bundle exec rails c
Loading production environment (Rails 5.1.6)
irb(main):001:0> ENV['RAILS_DATABASE_PASSWORD']
=> "xxx"
ちゃんと表示されている…
$ sudo vim /etc/profile
$ source /etc/profile
これに環境変数追加してもだめ( ;∀;)
CapistranoでUnicorn + nginx in Ubuntuにデプロイしたら環境変数が適用されない問題解決メモ - Qiita
どうもservice起動だと環境変数が適用されないようだ…でも
$ sudo /etc/init.d/unicorn start
これで起動してもだめ( ;∀;)
$ sudo vim /etc/init.d/unicorn
これに環境変数をまた直書きする…
export RAILS_DATABASE_PASSWORD='【DBパスワード】':$RAILS_DATABASE_PASSWORD
で、またUnicorn起動してみるとエラーが変わった↓
RuntimeError: YAML syntax error occurred while parsing /var/www/rails/hogehoge/config/database.yml. Please note that YAML must be consistently indented using spaces. Tabs are not allowed. Error: (<unknown>): mapping values are not allowed in this context at line 58 column 24
config/database.ymlの構成がダメなんだって。タブ入ってるんじゃないかって。
入ってねーよ。
もうまたconfig/database.ymlにDBパスワード直書きする…
いけた…( ;∀;)
とりあえずGithubとかに上げる予定もないし、これで進む…
Nginxの再設定
前記事で作成したRails個別のNginx設定ファイルをUniorn用に編集する。
$ sudo vim /etc/nginx/conf.d/hogehoge.conf
編集
upstream unicorn {
unix:/var/www/rails/hogehoge/tmp/sockets/unicorn.sock;
}
server {
listen 80;
server_name 【VMインスタンスの外部IP】;
access_log /var/log/nginx/access.log main;
error_log /var/log/nginx/error.log;
root /var/www/rails/hogehoge/public;
client_max_body_size 100m;
error_page 404 /404.html;
error_page 500 502 503 504 /500.html;
try_files $uri/index.html $uri @unicorn;
location @unicorn {
proxy_set_header X-Real-IP $remote_addr;
proxy_set_header X-Forwarded-For $proxy_add_x_forwarded_for;
proxy_set_header Host $http_host;
proxy_pass http://unicorn;
}
}
Nginx再起動
$ sudo systemctl restart nginx
Unicornの再設定
で、さっきUniorn設定時にUnicorn単体で使うために「listen 8080」としたところをNginx用の設定に戻す。
内容
# Nginxで使用
listen File.expand_path('../../tmp/sockets/unicorn.sock', __FILE__)
# とりあえず起動して動作確認をしたい場合は以下の設定を行う。
#listen 8080
Unicorn再起動
$ sudo service unicorn start
start production
master failed to start, check stderr log for details
エラー確認
$ view log/unicorn_stderr.log
E, [2018-04-13T11:53:19.349097 #31351] ERROR -- : adding listener failed addr=/var/www/rails/branches/tmp/sockets/unicorn.sock (in use)
Errno::EADDRINUSE: Address already in use - connect(2) for /var/www/rails/branches/tmp/sockets/unicorn.sock
ああああ上のエラーと一緒( ;∀;)まだ残ってたか…
unicorn.rbを絶対パスに直すのと、ソケットをunlink
$ cd tmp/sockets
$ ls
unicorn.sock
$ unlink unicorn.sock
$ ls
unicorn.sockなくなった。また「netstat -anp」してみてもunicorn.sock上がってくるがいけるだろうか。
$ sudo service unicorn start
start production
いけたーーーーー!!
あとCentOS7ではソケットがあるtmpを共有できないらしいので、対応しておく。
CentOS7にRailsとUnicornとNginxをインストールして連携させる(あとMySQLも) - とりとめも
AWS(Amazon Web Services) - AWS デプロイ 500エラー になります!(85616)|teratail
内容
# Nginxで使用
#listen File.expand_path('/var/www/rails/branches/tmp/sockets/unicorn.sock', __FILE__)
listen File.expand_path('/var/run/unicorn/unicorn.sock', __FILE__)
$ sudo vim /etc/nginx/conf.d/hogehoge.conf
内容
upstream unicorn {
#server unix:/var/www/rails/hogehoge/tmp/sockets/unicorn.sock;
server unix:/var/run/unicorn/unicorn.sock;
}
あと格納ディレクトリが存在しないとエラーになるので作成(unicorn.socketいらないんじゃ…?)
$ sudo mkdir /var/run/unicorn/unicorn.socket
$ sudo chmod 755 /var/run/unicorn/unicorn.socket
Unicorn設定ファイルを新規作成する。
ちなみにsockファイルの場所は以下を参照。
CentOS7にRailsとUnicornとNginxをインストールして連携させる(あとMySQLも) - とりとめも
AWS(Amazon Web Services) - AWS デプロイ 500エラー になります!(85616)|teratail
$ cd /var/www/rails/branches
内容
worker_processes Integer(ENV["WEB_CONCURRENCY"] || 2)
timeout 15
preload_app true
listen '/var/run/unicorn/unicorn.sock'
pid '/var/www/rails/hogehoge/tmp/pids/unicorn.pid'
before_fork do |server, worker|
Signal.trap 'TERM' do
puts 'Unicorn master intercepting TERM and sending myself QUIT instead'
Process.kill 'QUIT', Process.pid
end
defined?(ActiveRecord::Base) and
ActiveRecord::Base.connection.disconnect!
end
after_fork do |server, worker|
Signal.trap 'TERM' do
puts 'Unicorn worker intercepting TERM and doing nothing. Wait for master to send QUIT'
end
defined?(ActiveRecord::Base) and
ActiveRecord::Base.establish_connection
end
stderr_path File.expand_path('log/unicorn.log', ENV['RAILS_ROOT'])
stdout_path File.expand_path('log/unicorn.log', ENV['RAILS_ROOT'])
Rakeタスクの作成
Rakeタスクを新規作成する。
$ rbenv exec bundle exec rails g task unicorn
create lib/tasks/unicorn.rake
$ vim lib/tasks/unicorn.rake
内容
namespace :unicorn do
# Tasks
desc "Start unicorn"
task(:start) {
config = Rails.root.join('config', 'unicorn.rb')
#sh "unicorn -c #{config} -E development -D"
sh "unicorn -c #{config} -E production -D"
}
desc "Stop unicorn"
task(:stop) {
unicorn_signal :QUIT
}
desc "Restart unicorn with USR2"
task(:restart) {
unicorn_signal :USR2
}
desc "Increment number of worker processes"
task(:increment) {
unicorn_signal :TTIN
}
desc "Decrement number of worker processes"
task(:decrement) {
unicorn_signal :TTOU
}
desc "Unicorn pstree (depends on pstree command)"
task(:pstree) do
sh "pstree '#{unicorn_pid}'"
end
# Helpers
def unicorn_signal signal
Process.kill signal, unicorn_pid
end
def unicorn_pid
begin
#File.read("/home/vagrant/myapp/tmp/unicorn.pid").to_i
File.read("/var/www/rails/branches/tmp/pids/unicorn.pid").to_i
rescue Errno::ENOENT
raise "Unicorn does not seem to be running"
end
end
end
開発環境DB作成
開発環境のDB作成してなかったので、作成する。
$ rbenv exec bundle exec rake db:create RAILS_ENV=development
Created database 'branches_development'
MySQLに接続して確認。
mysql> show databases;
+----------------------+
| Database |
+----------------------+
| information_schema |
| hogehoge_development |
| hogehoge_production |
| mysql |
| performance_schema |
| sys |
+----------------------+
6 rows in set (0.17 sec)
hogehoge_developmentが作られてる~~\(^o^)/
Unicorn起動
$ rbenv exec bundle exec rake unicorn:start
エラー出たので確認。
内容
F, [2018-04-13T23:15:34.998489 #5224] FATAL -- : error adding listener addr=/var/run/unicorn/unicorn.sock
/var/www/rails/branches/vendor/bundle/ruby/2.5.0/gems/unicorn-5.4.0/lib/unicorn/socket_helper.rb:128:in `unlink': Permission denied @ apply2files - /var/run/unicorn/unicorn.sock (Errno::EACCES)
ここらへん↓参考にしてNginxの実行ユーザ変えてみたりUnicorn実行文にポート追加してみたりしたけどダメだった。
あとこのへんも↓参考にして「$ sudo /home/【ユーザ名】/.rbenv/bin/rbenv exec bundle exec rake unicorn:start」のroot権限で実行してみたけど、「/usr/bin/env: ruby: No such file or directory」というエラーが出てダメだった。
$ ls -al /var/run/unicorn/
srwxrwxrwx 1 root root 0 Apr 13 14:01 unicorn.sock
そもそもunlinkなら上のディレクトリの権限もいる…?(適当な予想)
$ ls -al /var/run/
drwxr-xr-x 3 root root 80 Apr 13 14:01 unicorn
$ sudo chmod 777 /var/run/unicorn
$ ls -al /var/run/
drwxrwxrwx 3 root root 80 Apr 13 14:01 unicorn
$ rbenv exec bundle exec rake unicorn:start
いけた!ちなみに775でもダメだった。
あと、↓この記事で同じく権限777にしてるからいいや。
Unicorn停止もしてみる。
$ rbenv exec bundle exec rake unicorn:stop
次はNginx起動だ!
Nginxの設定変更
$ sudo vim /etc/nginx/conf.d/hogehoge.conf
内容
upstream unicorn {
#server unix:/home/vagrant/myapp/tmp/unicorn.sock;
server unix:/var/run/unicorn/unicorn.sock;
}
server {
listen 80;
#server_name 192.168.33.12;
server_name 【VMインスタンスの外部IP】;
access_log /var/log/nginx/access.log;
error_log /var/log/nginx/error.log;
#root /home/vagrant/myapp/public;
root /var/www/rails/hogehoge/public;
client_max_body_size 100m;
error_page 404 /404.html;
error_page 500 502 503 504 /500.html;
try_files $uri/index.html $uri @unicorn;
location @unicorn {
proxy_set_header X-Real-IP $remote_addr;
proxy_set_header X-Forwarded-For $proxy_add_x_forwarded_for;
proxy_set_header Host $http_host;
proxy_pass http://unicorn;
}
}
$ sudo systemctl start nginx
よし、次は本番環境でもいけるかやってみる。
以下の部分を変更。
#sh "unicorn -c #{config} -E development -D"
sh "unicorn -c #{config} -E production -D"
$ rbenv exec bundle exec rake unicorn:start
いけた!\(^o^)/
ちなみにrbenv execって付けてるけど、システムのbundle使ってじゃなくてrbenvの現在有効なbundle使って実行って意味らしい。
7.Nginxの設定
Nginxの再々設定
ドキュメントルート変更
$ sudo vim /etc/nginx/conf.d/hogehoge.conf
root /var/www/rails/hogehoge/public;
Nginxの自動起動設定
$ sudo systemctl enable nginx.service
Nginx再起動。
先にNginxインストールして起動しちゃってたけど、今までの参考リンク見てるとUnicorn→Nginxの順にインストールしてるのよね(・_・;)
今度するときはそうしよう…
8.エラー対応
さて、UnicornもNginxも起動したわけだが、ブラウザで外部IPにアクセスすると

500エラー…
/var/log/nginx/error.log見てもアクセス日時のエラー出てないぞ…
public/index.html作成→エラー
/etc/nginx/conf.d/branches.confのserver_nameを「localhost」に変更→Nginxのデフォルトページ表示→多分 /etc/nginx/nginx.confの設定が上書きされてる→戻す
とかやってる間に表示された…
原因は謎…
しかしページがないのなら、public/500.htmlが表示されるべきでは?
Railsの方ルートやらまったく触ってないので、それを触ってから解決してみる。
とりあえず以上!
その他参考リンク
pidとsocketが分かりやすい
Nginx設定で複数ドメインとか設定する
Nginxの設定ファイルについて
GCEで事前準備(rubyなどインストールする編)
ああああ…アプリ作るまでが長い…
まずはrbenvを使ってRubyとRailsをインストールし、Unicornをインストールしていく。
Rubyインストール
1.Gitのインストール
Gitは、ファイルの変更履歴などを記録するバージョン管理ツール。
Gitを使ってrbnevをインストールしていくので、まず入っているか確認。
$ git --version
-bash: git: command not found
入ってないよと。
yumでインストールも出来るけど
$ yum info git
(略)
Name : git
Arch : x86_64
Version : 1.8.3.1
Release : 12.el7_4
Size : 22 M
Repo : installed
(略)
とGitにバージョンは古い。2013年VerのGitのようだ。
Gitの導入に必要なツールをインストールする。
$ sudo yum -y install curl-devel expat-devel gettext-devel openssl-devel zlib-devel
最新バージョンをここで確認。
git-2.17.0.tar.gzのリンクをメモ。
これを取得し、解凍したいが、その前に、HTTP/HTTPS経由でまとめてデータを取得するwgetをインストール。
wgetで上述のGitソースを取得し、解凍する。
$ cd /usr/local/src/
$ sudo wget https://mirrors.edge.kernel.org/pub/software/scm/git/git-2.17.0.tar.gz
$ ls
git-2.17.0.tar.gz
$ sudo tar xzvf git-2.17.0.tar.gz
$ ls
git-2.17.0 git-2.17.0.tar.gz
git-2.17.0フォルダの中にいっぱい解凍されました。
これをコンパイル等の処理を自動的に行うmakeコマンドを使ってビルドしてインストール。
ちなみにインストール先は以下のリンクを参考にして変更。
$ cd
$ mkdir usr
$ sudo make prefix=$HOME/usr all
GIT_VERSION = 2.17.0
* new build flags
CC credential-store.o
/bin/sh: cc: command not found
make: *** [credential-store.o] Error 127
ツールが足りないみたい。
$ sudo yum install gcc
$ sudo make prefix=$HOME/usr all
長い…いけた!
$ sudo make prefix=$HOME/usr install
$ source /etc/profile
確認する。
$ git --version
git version 1.8.3.1
入った\(^o^)/
気になるので、wgetしたgitの圧縮ファイルは削除。
$ cd /usr/local/src/
$ ls
git-2.17.0 git-2.17.0.tar.gz
$ sudo rm -rf git-2.17.0.tar.gz
$ ls
git-2.17.0
2.rbenvのインストール
rbenvをインストール(clone)する。
$ git clone https://github.com/sstephenson/rbenv.git ~/.rbenv
環境設定で.bash_profileファイルに書き込む。
$ echo 'export PATH="$HOME/.rbenv/bin:$PATH"' >> ~/.bash_profile
$ echo 'eval "$(rbenv init -)"' >> ~/.bash_profile
$ source ~/.bash_profile
rbenvのバージョン確認。
$ rbenv --version
rbenv 1.1.1-30-gc8ba27f
3.Rubyのインストール
最新版Rubyを取得
ruby-build を インストール(clone)する。
$ git clone https://github.com/sstephenson/ruby-build.git ~/.rbenv/plugins/ruby-build
Rubyの最新版リストを確認する。
$ rbenv install --list
Available versions:
1.8.5-p52
1.8.5-p113
(略)
2.4.3
2.4.4
2.5.0-dev
2.5.0-preview1
2.5.0-rc1
2.5.0
2.5.1 ←安定版っぽい
2.6.0-dev
2.6.0-preview1
(略)
Rubyをインストール
ruby2.5.1をインストール
$ rbenv install -v 2.5.1
Downloading ruby-2.5.1.tar.bz2...
-> https://cache.ruby-lang.org/pub/ruby/2.5/ruby-2.5.1.tar.bz2
/tmp/ruby-build.20180410110650.6828 ~
warning: bzip2 not found; consider installing `bzip2` package
tar (child): bzip2: Cannot exec: No such file or directory
tar (child): Error is not recoverable: exiting now
/home/sato/.rbenv/plugins/ruby-build/bin/ruby-build: line 213: pushd: ruby-2.5.1: No such file or directory
BUILD FAILEDtar: Child returned status 2
tar: Error is not recoverable: exiting now
(CentOS Linux 7 using ruby-build 20180329-2-ge08b257)
Inspect or clean up the working tree at /tmp/ruby-build.20180410110650.6828
Results logged to /tmp/ruby-build.20180410110650.6828.log
Last 10 log lines:
/tmp/ruby-build.20180410110650.6828 ~
warning: bzip2 not found; consider installing `bzip2` package
tar (child): bzip2: Cannot exec: No such file or directory
tar (child): Error is not recoverable: exiting now
tar: Child returned status 2
tar: Error is not recoverable: exiting now
あら~~なんかエラー出た。とりあえず青字に着目したら
bzip2 コマンドが入ってなかったのが原因みたい。なのでインストール。
$ sudo yum install bzip2
その後再度ruby2.5.1インストール。
$ rbenv install -v 2.5.1
(略)
63% [549/871] lib/rss/slash.rb
Before reporting this, could you check that the file you're documenting
has proper syntax:
/home/sato/.rbenv/versions/2.5.1/bin/ruby -c lib/rss/slash.rb
RDoc is not a full Ruby parser and will fail when fed invalid ruby programs.
The internal error was:
(FiberError) can't alloc machine stack to fiber: Cannot allocate memory
uh-oh! RDoc had a problem:
can't alloc machine stack to fiber: Cannot allocate memory
run with --debug for full backtrace
make: *** [rdoc] Error 1
BUILD FAILED (CentOS Linux 7 using ruby-build 20180329-2-ge08b257)
Inspect or clean up the working tree at /tmp/ruby-build.20180410122652.7569
Results logged to /tmp/ruby-build.20180410122652.7569.log
Last 10 log lines:
The internal error was:
(FiberError) can't alloc machine stack to fiber: Cannot allocate memory
uh-oh! RDoc had a problem:
can't alloc machine stack to fiber: Cannot allocate memory
run with --debug for full backtrace
make: *** [rdoc] Error 1
結構待たせたくせにエラーだって!なんてこと!
メモリー足りないっぽい…ふふふふ…早速きたーーーーーーーーーー
GCEのf1-microインスタンスがハングアップする話 – きゃわいどっとてっく
遙かデジタリアへ: RubyのCGIをGoogle Cloud Platformの無料枠で動かしたい ~(1)セットアップ
スワップ領域を設定
メモリ状況を確認。
$ free -m
↓結果
| total | used | free | shared | buff/cache | available | |
|---|---|---|---|---|---|---|
| Mem | 588 | 262 | 248 | 8 | 77 | 230 |
| Swap | 0 | 0 | 0 |
0.6GBのうち半分ぐらいしかメモリ使えない…
ここらへん参考にしてスワップメモリを設定する。
遙かデジタリアへ: RubyのCGIをGoogle Cloud Platformの無料枠で動かしたい ~(1)セットアップ
ちなみにスワップ領域とは
物理メモリの2倍程度をスワップ領域に当てればいいようなので1GBぐらいかな。
ddコマンドでスワップ用ファイルを作成する。(0で埋め尽くされた1GBのswap_1GBというファイル作成)
$ cd /home
$ sudo mkdir swap
$ sudo dd if=/dev/zero of=/home/swap/swap_1GB bs=1024 count=1024000
Swap領域にするファイルを指定する。
$ sudo mkswap /home/swap/swap_1GB
Swap領域を有効化する。
$ sudo swapon /home/swap/swap_1GB
マウント時に参照される設定ファイル/etc/fstabを編集して、OS起動時に作成したスワップ領域をマウントされるようにする。
$ sudo vim /etc/fstab
以下を追記
# 追加180410 OS起動時にスワップ領域を自動マウント
/home/swap/swap_1GB none swap sw 0 0
※swとは「swapon -a」の意味らしく、「-a」は有効化するときに/etc/fstab の3番目のフィールドが「swap」となっているデバイスをすべて有効にするという意味。
スワップ領域の確認
$ free -mt
↓結果
| total | used | free | shared | buff/cache | available | |
|---|---|---|---|---|---|---|
| Mem | 588 | 263 | 50 | 8 | 274 | 211 |
| Swap | 999 | 0 | 999 | |||
| Total | 1588 | 263 | 1050 |
スワップ領域の情報表示
$ swapon -s
Filename Type Size Used Priority
/home/swap/swap_1GB file 1023996 0 -1
メモリスワップの度合いを調整
$ echo 10 | sudo tee /proc/sys/vm/swappiness
10
$ echo vm.swappiness = 10 | sudo tee -a /etc/sysctl.conf
vm.swappiness = 10
ファイル権限を変更
$ sudo chown root:root /home/swap/swap_1GB
$ sudo chmod 0600 /home/swap/swap_1GB
Rubyをインストール(再)
再度Ruby2.5.1をインストールする。
$ rbenv install -v 2.5.1
(略)
The Ruby readline extension was not compiled.
ERROR: Ruby install aborted due to missing extensions
Try running `yum install -y readline-devel` to fetch missing dependencies.
またエラーかよ~~~~~
またツールが足りなかったようorz
$ sudo yum install -y readline-devel
再度Ruby2.5.1をインストールする。
$ rbenv install -v 2.5.1
お?いけったぽい
環境設定
再読み込みする。
$ rbenv rehash
インストールされているruby一覧を確認する。
$ rbenv versions
2.5.1
先ほどインストールした最新版に設定する。(Rubyのバージョンを切り替える)
$ rbenv global 2.5.1
確認。
$ ruby -v
ruby 2.5.1p57 (2018-03-29 revision 63029) [x86_64-linux]
できた\(^o^)/
Railsインストール
RubyのフレームワークであるRailsをインストールしていく。
ちなみにRailsアプリは/var/www/railsに置いていこうかなと…
/var/www/はApacheのデフォルトディレクトリだけど、インターネット関連のファイルはここに置くイメージ。
前回Nginxの設定ファイルにそう書いたし…勝手に作っていいのかな…
$ cd /var
$ sudo mkdir www
$ sudo mkdir rails
後で問題あれば適宜対応していきます\(^o^)/適当!
$ cd /var/www/rails
1.Bundlerのインストール
Railsをgemでインストールしてもいいけど、互換性を保ちながらインストールしてくれるBundlerが欲しい。
Gemのアップデート
$ gem update --system
Latest version already installed. Done.
rbenvで現在有効なrubyのgemを使って、Bundlerのインストールして再読込
※「rbenv exec」はrbenvで現在有効なrubyのgemという指定
$ rbenv exec gem install bundler
$ rbenv rehash
$ bundler -v
Bundler version 1.16.1
2.Bundlerを使ってRailsのインストール
Gemfileという雛形ファイルを作成
$ rbenv exec bundle init
(略)
Errno::EACCES: Permission denied @ rb_sysopen - Gemfile
(略)
おおう…権限不足だと…Gemfileってそもそもどこに作られるんかいなといろいろ調べても出てこない…しかし状況からこの「」を実行したカレントディレクトリに作成されるみたいだぞ。そもそもアプリディレクトリに作成していいのかなと調べたら、いいぽい。
なので、/var/www/railsの所有者を変更!
SSH接続ユーザはmujirushiとして(実際は違います)
$ ls -al
total 0
drwxr-xr-x 3 root root 22 Apr 10 16:03 .
drwxr-xr-x. 19 root root 265 Apr 10 15:59 ..
drwxr-xr-x 2 root root 6 Apr 10 16:03 rails
$ sudo chown mujirushi:mujirushi rails
$ ls -al
total 0
drwxr-xr-x 3 root root 22 Apr 10 16:03 .
drwxr-xr-x. 19 root root 265 Apr 10 15:59 ..
drwxr-xr-x 2 mujirushi mujirushi 6 Apr 10 16:03 rails
再度Gemfileという雛形ファイルを作成
$ rbenv exec bundle init
Writing new Gemfile to /var/www/rails/Gemfile
出来た~~\(^o^)/
$ vim Gemfile
# frozen_string_literal: true
source "https://rubygems.org"
git_source(:github) {|repo_name| "https://github.com/#{repo_name}" }
# gem "rails"
# 追加180411
gem "rails", "5.1.5"
赤字部分を追記。Rails5.1.5にしたのは、Ruby2.5.1の先人記事はないけどRuby2.5.0+Rails5.1.5ならあったから…Ruby2.5.0にすれば良かったかな(・_・;)
$ ls -a
. .. Gemfile
$ rbenv exec bundle install --path vendor/bundle
$ ls -a
. .. .bundle Gemfile Gemfile.lock vendor
ディレクトリやファイルが出来ました。
インストールされているライブラリの一覧表示する。
$ rbenv exec bundle list
今回はここまで。
次回はRailsアプリの作成。
GCEで事前準備(サーバー設定編)
前回はえらく長くなってしまった…
他のこともあるけど、自分のローカルPCユーザ名日本語であんなに時間取られるとは思わなかった…( ;∀;)
職場復帰まで!!!時間が!!!!!!ないの!!!!!(地団駄)
ローカルクライアントからSSH接続出来るまで出来たので続き。
サーバー設定残作業
1.rootのパスワード設定
前回ローカルクライアントからSSH接続が出来たので、残りの作業をやってしまう。
というかApache再起動するときにrootのパスワード訊かれるから事前にやっときましょう。
【クリックとコピペだけでできる】Google Cloud Platform上にWebサーバー(Nginx)を構築してWordPressを動かす【CentOS】 - Qiita
$ sudo passwd root
パスワード2回入れたら設定OK!
2.ポート22を閉じるルールの追加
GCE の無料枠のサーバを立るときに、初見でハマりそうなところ - Qiita
前記事で書いたポート開けたことの反対を行う。ポート22を閉じるファイアウォールルールを作成する。

SSH接続出来ることを確認して終了。
3.タイムゾーンを東京に設定
遙かデジタリアへ: RubyのCGIをGoogle Cloud Platformの無料枠で動かしたい ~(1)セットアップ
表題の通り
$ sudo timedatectl set-timezone Asia/Tokyo
Apacheインストール(追記:アンイストールしました)
追記(18/04/09)
自分のGCE無料枠のスペック(メモリ0.6G)にビビりすぎでApacheより軽量とされるNginxをインストールすることにしました。そのため、進む場合は「Nginxのインストール」→「MySQLのインストール」で進んでください…
1.Apacheインストール
WebサーバーのソフトウェアのひとつであるApacheをインストールする。
遙かデジタリアへ: RubyのCGIをGoogle Cloud Platformの無料枠で動かしたい ~(1)セットアップ
Apacheをインストール&初期設定 - ゼロからはじめるWEBプログラミング入門
Google Compute Engine を使ってみる(3) http サーバーを公開する #gcloud #gce - jitsu102's blog
Google Cloud Platformで無料Webサーバを作る – mktiaの備忘録
SSH接続して、キャッシュ削除で綺麗にしてから
$ sudo yum clean all
もちろん入ってないよね~の確認
$ httpd -v
-bash: httpd: command not found
Apacheインストール
途中でホンマにインストールするか訊いてくるので「y」と答えつつ、「Complete!」表示されたらOK
Apache起動
$ sudo service httpd start
自分のVMインスタンスの外部IPをブラウザで確認したら下図が表示された。
もうこれだけでうひょー(・∀・)底辺
ちなみにhttps接続はまだできず。SSL設定してないのでそりゃそうだ。

2.Apache初期設定
①Apacheをインストール&初期設定 - ゼロからはじめるWEBプログラミング入門
②Apache:インストール(httpd)、初期設定、その他 - Qiita
Apache設定ファイルhttpd.confのバックアップを作成して、上記リンク①の通り編集。
ちなみにApache設定ファイルhttpd.confはインストールの仕方によって場所は変わるようだよ。
httpd.confについて調べたのでまとめたよ - ✘╹◡╹✘
今回はCentOSでソースから取得したわけじゃないので/etc/httpd/conf/httpd.confです。
$ sudo cp /etc/httpd/conf/httpd.conf /etc/httpd/conf/httpd_bk180406.conf
$ vim /etc/httpd/conf/httpd.conf
▼/etc/httpd/conf.d/autoindex.conf
$ sudo cp /etc/httpd/conf.d/autoindex.conf /etc/httpd/conf.d/autoindex_bk180406.conf
$ sudo vim /etc/httpd/conf.d/autoindex.conf
▼/etc/httpd/conf.d/userdir.conf
$ sudo cp /etc/httpd/conf.d/userdir.conf /etc/httpd/conf.d/userdir_bk180406.conf
$ sudo vim /etc/httpd/conf.d/userdir.conf
設定反映のためのApache再起動
$ sudo systemctl reload httpd
再起動コマンドが他に「service httpd restart」や「/usr/local/apache2/bin/apachectl restart」もあったがCentOS7のサービス制御は「systemctl」を使えとのこと。
CentOS 7.0 では systemctl を使う。 - たこはちの「へのかっぱ」日記
apachectlコマンドとhttpdの違い - 女子WEBエンジニアのTechメモ
あとWEBサービスを公開し始めたら、再起動は「reload」や「restart」より「graceful」の方がいいみたい。しかしhttpd.confの反映は「reload」ですって。
apache再起動にはrestartよりもgracefulを使うべき - 女子WEBエンジニアのTechメモ
遙かデジタリアへ: RubyのCGIをGoogle Cloud Platformの無料枠で動かしたい ~(1)セットアップ
MySQLのインストール
1.MySQLのインストール
MySQL5.6と5.7に悩んだが、違いを見てざっくり言うとユーザのパスワード管理が5.7の方が強固っぽく、パフォーマンスが3倍らしい。しかし長期パスワード変更しないユーザがいると強制的にパスワードを変更させられるらしいので注意が必要。
MySQL 5.7にやられないためにおぼえておいてほしいこと
MySQL5.6と5.7のちょっとした違いとinnodb_thread_concurrencyの影響 - hiroi10の日記
第10回 yum, rpmインストールにおけるMySQL 5.6とMySQL 5.7の違い:MySQL道普請便り|gihyo.jp … 技術評論社
Oracle、5.6より三倍速い「MySQL 5.7.9 GA」をリリース | ソフトアンテナブログ
CentOS7にMySQL5.7をインストール
CentOS 7 に MySQL 5.7 を yum インストールして初期設定までやってみた - enomotodev’s blog
CentOS7.3にMySQL5.7をyumでインストールする - Qiita
MariaDBの削除
CentOS7からデフォルトDBがMariaDBになり、MySQLと競合する可能性があるので削除しておく。(MariaDBの存在確認してから 本体とデータフォルダを削除)
削除するときってドキドキするね…
CentOS7に公式MySQLのリポジトリを追加
$ sudo rpm -ivh http://dev.mysql.com/get/mysql57-community-release-el7-8.noarch.rpm
追加したリポジトリを指定してインストールして確認
$ sudo yum install --enablerepo=mysql57-community mysql-community-server
$ mysqld --version
mysqld Ver 5.7.21 for Linux on x86_64 (MySQL Community Server (GPL))
よしよし入ったよ~
MySQL起動して、自動起動も設定しておく
$ sudo systemctl start mysqld.service
$ sudo systemctl enable mysqld.service
2.MySQLの初期設定
MySQLの初期パスワード設定
MySQL5.7からセキュリティ強固になって、勝手に設定されるので確認しないといけないらしいですわ。
$ sudo cat /var/log/mysqld.log | grep password
2018-04-09T02:35:44.722093Z 1 [Note] A temporary password is generated for root@localhost: 【初期パスワード】
MySQLのセキュリティ設定
対話形式で最低限のセキュリティ設定をしておく。
$ mysql_secure_installation
(略)
Enter password for user root:【先程の初期パスワード入力】
The existing password for the user account root has expired. Please set a new password.
New password:【新しいパスワード入力】
Re-enter new password:【再度新しいパスワード入力】
... Failed! Error: Your password does not satisfy the current policy requirements
(怒られました(・_・;)公式のパスワード要件を満たしていないようです)
New password:【再度要件満たした新しいパスワード入力】
Re-enter new password:【再度新しいパスワード入力】
Estimated strength of the password: 100
Do you wish to continue with the password provided?(Press y|Y for Yes, any other key for No) : y
By default, a MySQL installation has an anonymous user,
allowing anyone to log into MySQL without having to have
a user account created for them. This is intended only for
testing, and to make the installation go a bit smoother.
You should remove them before moving into a production
environment.
Remove anonymous users? (Press y|Y for Yes, any other key for No) :y(匿名ユーザアカウントanonymous削除)
Success.
Normally, root should only be allowed to connect from
'localhost'. This ensures that someone cannot guess at
the root password from the network.
Disallow root login remotely? (Press y|Y for Yes, any other key for No) :y(ローカルホスト以外のリモートからアクセス可能なroot削除)
Success.
By default, MySQL comes with a database named 'test' that
anyone can access. This is also intended only for testing,
and should be removed before moving into a production
environment.
Remove test database and access to it? (Press y|Y for Yes, any other key for No) :y(テストDB削除)
- Dropping test database...
Success.
- Removing privileges on test database...
Success.
Reloading the privilege tables will ensure that all changes
made so far will take effect immediately.
Reload privilege tables now? (Press y|Y for Yes, any other key for No) :y(今すぐ特権テーブルリロードする)
Success.
All done!
できた\(^o^)/ちなみに公式のパスワード要件は以下
- 英数字はどちらも1文字以上使用
- 英字は小文字大文字どちらも1文字以上使用
- 特殊文字は1文字以上使用
厳しいよ…
ではもう一度アクセス
$ mysql -u root -p
Enter password:
Welcome to the MySQL monitor. Commands end with ; or \g.
Your MySQL connection id is 7
Server version: 5.7.21 MySQL Community Server (GPL)
Copyright (c) 2000, 2018, Oracle and/or its affiliates. All rights reserved.
Oracle is a registered trademark of Oracle Corporation and/or its
affiliates. Other names may be trademarks of their respective
owners.
Type 'help;' or '\h' for help. Type '\c' to clear the current input statement.
うああああああああアクセス出来た嬉しい~~~~~~~
もう初めてアクセス出来たような喜び…会社で何度かアクセスしてたけどもう長らくしてないや…何かDB好きなのよね…その割に勉強進んでないけど…頑張ろう…
ちなみに中身確認
mysql> show databases;
+--------------------+
| Database |
+--------------------+
| information_schema |
| mysql |
| performance_schema |
| sys |
+--------------------+
4 rows in set (0.22 sec)
あ、こんなけ初期データベースあるのね、ふむふむ。
ここにRailsアプリ用のデータベース追加するよ。後々。
MySQLの設定変更
上述通り、MySQL5.7は長期パスワード変更しないユーザがいると強制的にパスワードを変更させられるらしいのでその設定をOFFする。(長期→360日)
$ sudo cp my.cnf my_bk180409.cnf
$ ls
$ sudo vim /etc/my.cnf
# For advice on how to change settings please see
# http://dev.mysql.com/doc/refman/5.7/en/server-configuration-defaults.html
[mysqld]
#
# Remove leading # and set to the amount of RAM for the most important data
# cache in MySQL. Start at 70% of total RAM for dedicated server, else 10%.
# innodb_buffer_pool_size = 128M
#
# Remove leading # to turn on a very important data integrity option: logging
# changes to the binary log between backups.
# log_bin
#
# Remove leading # to set options mainly useful for reporting servers.
# The server defaults are faster for transactions and fast SELECTs.
# Adjust sizes as needed, experiment to find the optimal values.
# join_buffer_size = 128M
# sort_buffer_size = 2M
# read_rnd_buffer_size = 2M
datadir=/var/lib/mysql
socket=/var/lib/mysql/mysql.sock
# Disabling symbolic-links is recommended to prevent assorted security risks
symbolic-links=0
log-error=/var/log/mysqld.log
pid-file=/var/run/mysqld/mysqld.pid
## 追加180409
# 文字コードをutf-8に
character-set-server=utf8
# デフォルトのストレージエンジン
default-storage-engine=InnoDB
## 追加180409
[mysql]
ちなみに
[mysqld]セクションはmysqlサーバーへの設定
[mysql]セクションはmysqlクライアントツールへの設定
とのこと。
基礎MySQL ~その2~ my.cnf (設定ファイル) - Qiita
ストレージエンジンはInnoDBとMyISAMがあって、初心者はInnoDBにしとけばいい…と思う…MySQL5.5以降ではいちいち設定しなくてもデフォルトがInnoDBのようですが。
MySQLの「InnoDB」と「MyISAM」についての易しめな違い - (2015年までの)odaillyjp blog
設定の反映
$ sudo systemctl restart mysqld.service
以上でMySQL5.7の初期設定は完了。
MySQL5.7に拘らなければ以下参考にしても良かったかも。ってか拘る必要もなかったな(・_・;)
Google Cloud Platformで無料Webサーバを作る – mktiaの備忘録
【クリックとコピペだけでできる】Google Cloud Platform上にWebサーバー(Nginx)を構築してWordPressを動かす【CentOS】 - Qiita
途中で気づいた話
次にRailsアプリを作りたかったんですが、下記の記事を見て今の環境でいいのかビビってる…OSをUbuntuにすればよかったとかApacheじゃなくてNginxにすればよかったとか…またやり直しになっちゃうので、とりあえずこのまま進めてメモリ不足になったらスワップメモリを追加設定すればいいのかな?あ、でもApacheアンイストールは簡単かな…
[GCE] f1-microでのWordPress運営が重すぎたのでg1-smallにしてみた │ revdev
GCEのf1-microインスタンスがハングアップする話 – きゃわいどっとてっく
[GoogleComputeEngine]GCEにてf1-microを利用してWPを運用した結果(状況、料金等) - Qiita
GCEが重いのでベンチマークしたら驚きの結果に | A-tak-dot-com
Apacheのアンイストール
Apacheのアンイストールしちゃおうか…ごめんなさい。
Apache確認。
$ httpd -v
Server version: Apache/2.4.6 (CentOS)
Server built: Oct 19 2017 20:39:16
Apacheのアンイストール。
【yum remove】yumで安全にアンインストールする方法 | UX MILK
しちゃった…
MySQLに影響ないかログイン確認。
$ mysql -u root -p
Nginxのインストール
1.Nginxのインストール
CentOS7.1でnginxを用いたウェブサーバの構築 - Qiita
yumリポジトリにNginxを追加して、yumでインストールできるようにする。
$ sudo rpm -ivh http://nginx.org/packages/centos/7/noarch/RPMS/nginx-release-centos-7-0.el7.ngx.noarch.rpm
$ sudo yum -y update nginx-release-centos
$ sudo yum -y --enablerepo=nginx install nginx
Nginxのバージョン確認
$ nginx -v
nginx version: nginx/1.12.2
Nginx公式サイトでStable version(安定版)として1.12.2があるのでOK(18/04現在)
CentOS 7 (5, 6) で "安定版 (最新版)" のNginxをインストールする方法 - Qiita
自動起動設定
$ sudo systemctl enable nginx
Created symlink from /etc/systemd/system/multi-user.target.wants/nginx.service to /usr/lib/systemd/system/nginx.service.
Nginx起動
$ sudo systemctl start nginx
VMインスタンスの外部アドレスをブラウザで確認したら、下図の表示。\(^o^)/

デフォルトでは/usr/share/nginx/html/index.htmlのファイルが表示されている。
2.Nginxの初期設定
Nginxの設定ファイルをconf.dディレクトリに作成して、Mezzanineを動かしてみる | kazsoga blog
ちなみにNngixの設定ファイルは、/etc/nginx/nginx.confにある。
参考リンクに記述のあった/etc/nginx/conf.d/default.confはなかった。
しかし/etc/nginx/conf.d/以下に○○.confファイルを作成すると、起動時に読み込んでくれる。
【アプリ名】.confファイル(名前何でもいい)を作成して中身を追加。
$ sudo vim /etc/nginx/conf.d/【アプリ名】.conf
server {
listen 80;
server_name 【アクセス可能なIPアドレス、もしくはドメイン】;
access_log /var/log/nginx/access.log main;
error_log /var/log/nginx/error.log;
root /var/www/【アプリ名】/public;
error_page 404 /404.html;
error_page 500 502 503 504 /50x.html;
}
再起動
$ sudo systemctl restart nginx
再度外部アドレスにアクセスすると
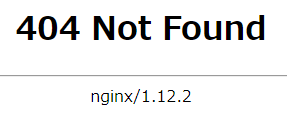
そりゃそうだrootを「/var/www/【アプリ名】/public」に変更したから。
これにRailsアプリを入れていこう。
残作業メモ
やりたいことをメモっとく。
必要になれば
- PHPインストール
MySQLと一緒に使うことが多いPHPを必要になればどっかで入れる。ビルドがf1-microのメモリ0.6GBじゃ耐えられないとか聞くので、とりあえず必要になるまでは放置。
開発一通り終わって公開する前
- ドメイン取得(とりあえず無料ドメイン予定 freenpm.comで取得予定)
- SSL証明書の取得(とりあえず無料のLet's Encrypt予定)
▼参考
GCE の無料枠のサーバを立るときに、初見でハマりそうなところ - Qiita
GCEでWordPressがほぼ無料運用できるようになったので改めてまとめる – codes / cipher
今回はここまで。
GCEで事前準備(SSHでサーバー接続するまで編)
課金状況ふまえまして、GCEでRailsアプリ作ることにしました( ;∀;)
今までの苦労は…ってあんまりしてないか。せっかく環境作らなくていいと思ったのに\(^o^)/
と思ったらワンクリックでRuby on Rails環境をデプロイできるだと…!?
しかし課金部分が気になる…そしてそれをどうやって作るのかの記事が見当たらない…けど関係ないWordPressの記事見てたら出てきた笑。
これかな?
LAMP Stack|Google Cloud Launcher
でもインスタンスがn1-standard-1で無料枠のf1-microじゃないっぽいのでやめとこう…
今回は常時無料枠を気にして進めていきたい。けど試しながら進めるので課金されたら後戻りかそのまま突っ走るかを決めていきたい。
▼GCE無料枠
Google Compute Engine の料金 | Compute Engine ドキュメント | Google Cloud
-----------------------------------------------------------------------------------------------------------
ではでは、GCEでRailsアプリ作成の事前準備をしていこう。
これ参考に進めていく。
・いつでも無料!Google Compute Engine 常時無料枠の使い方 | あぱーブログ
・遙かデジタリアへ: RubyのCGIをGoogle Cloud Platformの無料枠で動かしたい ~(1)セットアップ
・Google Compute Engine で apacheウェブサーバを無料でつくってみた【GoogleComputeEngine】 - DRYな備忘録
・GCEでWordPressがほぼ無料運用できるようになったので改めてまとめる – codes / cipher
GCPの設定
1.プロジェクト作成
GCPコンソールからプロジェクトを新規作成する。
2.VMインスタンス作成
Compute Engine>VMインスタンスから作成する。

- ゾーン(リージョン)は米国のみ無料枠のため、USから始まるゾーンを選択
- マシンタイプは無料枠のmicro
- ブートディスクは慣れたCentOSで、標準の永続ディスク無料枠分30GB
※CentOSは会社で使ってるからと以前これで構築したから

- IDとAPIへのアクセスはデフォルトのまま
※後で変更出来るようだが、シャットダウンしないとだめらしい
GCE(Google Compute Engine)のVMインスタンスのアカウントスコープを後から変更する - Qiita
インスタンスのサービス アカウントの作成と有効化 | Compute Engine ドキュメント | Google Cloud
- ファイアウォールはあとでSSL接続検討してるからどっちもチェック
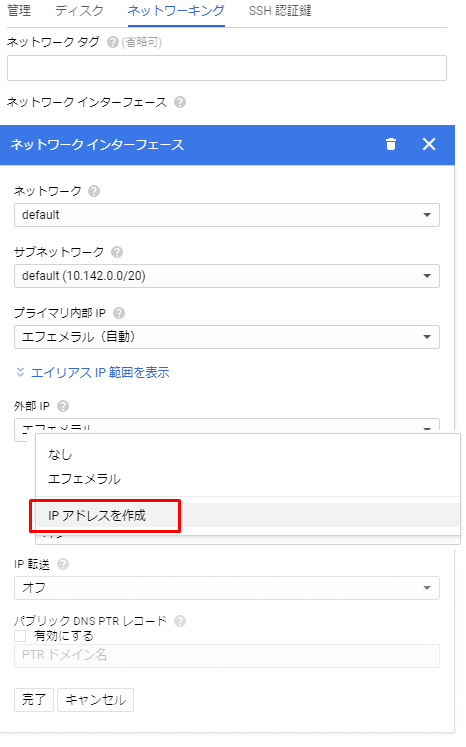

- 外部IPをIPアドレスを作成に選択
名前は適当に入力して静的IPアドレスを予約。
※固定IPアドレスはひとつなら無料。ただしインスタンス削除後にその固定IPアドレスがどこにも割り当てられず、宙ぶらりんになると課金。
インスタンス削除後は必ず静的IPアドレスを削除!
方法は以下リンクの下部参照。 - 他はデフォルトのまま
SSH接続設定
1.SSHクライアントへの接続
ローカルPCで動くネイティブSSHクライアントの方が後々便利らしいが、とりあえず今はブラウザ上からSSHクライアントを起動できるのでそれでする。
gcloudコマンドはインスタンス管理とかに便利らしい。

cloud shellでgcloudコマンドを実行するために自分のプロジェクトにアクセスするための一文がもう書いてあるのでそのままエンター
WARNINGと出てビクっとするが、SSH鍵がないよ~との警告。
SSH鍵作る?と聞いてきてくれるので「y」を入力。
パスフレーズを入力。で、再度入れろに対しても入力するとSSH秘密鍵を作成してComputeEngineに登録される。
SSH秘密鍵のパスフレーズは(つけるなら)11文字以上にしましょうねという話 - 本当は怖い情報科学
ちなみにあとで変更も可能。その場合は(今はやってない)、
Enter passphrase for key '/home/【Googleアカウント】/.ssh/google_compute_engine':
さらにパスフレーズを聞いてくるので入れるとログインされる。
2.SSHのセキュリティ対策
せっかく作成したVMインスタンスを好きなようにいじっていきたいが、その前にセキュリティ対策をしていく。
デフォルトではポート番号22が使われているが、このままだと悪意あるユーザに攻撃されまくりで課金されちゃうのも嫌なので変更します!
参考するのは
①CentOSでSSHのポート番号変更~VPSのセキュリティ対策! | Affiwork
②SSHのセキュリティ対策について | server-memo.net
③GCE の無料枠のサーバを立るときに、初見でハマりそうなところ - Qiita
④【GCE/CentOS 7】Google Compute Engine で ssh に繋がらない(sshd起動失敗)場合の復旧方法 - TokunagaKazuya.tk
3番目リンクの通りやったら4番目リンクのようにSSH接続できなくなるよう。なので3番目リンクと4番目リンクは合わせ技で。
ファイアウォールルールの追加
ネットワーキング>VPCネットワーク>ファイアウォール ルール>ファイアウォール ルールの作成

隠れてる部分は全部開けたいポート番号。隠す必要ないけど(・_・;)
このポート番号は好きな番号(0番~65535番)でいいけど、よく使われているwell knownポート(0~1023番)、企業等のプログラムの登録済みポート番号(1024番~49151番)以外がいい。
ファイアウォールルール作成後、Compute Engine>VMインスタンス>該当のVMインスタンス>編集>ネットワーク タグに上記で作成したターゲットタグを追加

SELinux と iptables(firewall) の無効化
CentOSで標準に備わっているSELinux と iptables(firewall) を無効化する。
/etc/selinux/configを編集したいので、その前にバックアップ。
$ cd /etc/selinux/
ファイル確認。うむあるな。バックアップしてまた確認。
$ sudo cp config config_180403
編集~下図のような編集をする。
$ sudo vim config

このvimがね、まだ慣れないのよ。使いづらい。でも慣れたらvim最高~~!ふ~~!ってなるらしいので慣れるまで使いまくるぜ。
脱初心者を目指すなら知っておきたい便利なVimコマンド25選 (Vimmerレベル診断付き) - Qiita
ちなみに
- 「/SELINUX」でSELINUXを検索、「n」で次のSELINUXを検索
- 「i」で編集モード
- 「ctrl + [」でコマンドモードに戻る
- 「:wq」で保存して閉じる(「:q」で保存せずに閉じる)
- 「:q!」で編集したはいいものの、なかったことにしたいので保存せずに閉じる
ポート番号の変更
ポート番号は/etc/ssh/sshd_configファイルに書いてあり、編集の前にバックアップ。
$ cd /etc/ssh
$ sudo cp sshd_config sshd_config_180403
できたできた。
以下のように編集。デフォルトから「#Port 22」とコメントアウトされているので、その下に「Port ポート番号」を追加。
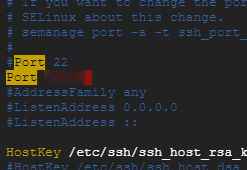
リロードして設定を反映させる。
$ sudo systemctl restart sshd
ここで一旦確認
ブラウザ上のSSHからアクセスできないことを確認。
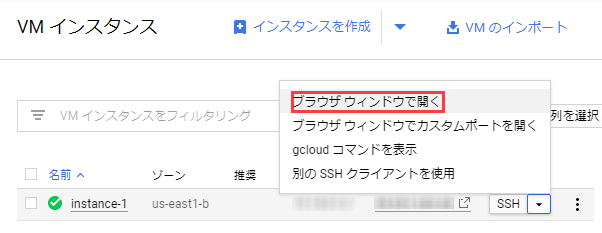
以下のエラーが出るので、ポート22で接続できなくなったようだ。

また、「gcloudコマンドを表示」でも接続できなくなった。
以下を試したけどConnection timed outする。
ターミナルから GCE に gcloud でログインする場合(SSH ポート変更後) - 技術メモ2
ちなみに「ブラウザ ウィンドウでカスタムポートを開く」からなら指定のポート番号からSSH接続できた。sudoも使える。しかし遅い。接続がとんでもなく遅い。
サーバーの再起動
で、上記の反映確認。
どちらもdisabledと出たのでOK!
ちなみにrootのパスワード設定したり、参考リンク② の通り進めたかったけど、gcloudコマンドでSSH接続がまだ出来ないので、ちょっと後回し…
ローカルからSSH接続
1.GoogleCloudSDKのインストール
ブラウザのターミナルから接続すると遅いので、GoogleCloudSDKをインストール。
▼参考
インストール失敗した…
Windows版Google Cloud SDKのインストールに失敗する - Qiita
これ試したけど上手くいかず…とりあえずユーザ名が日本語なのが原因らしい。そこでc:\users\ユーザ名~を変更しました。変更するだけじゃだめよ。
もう幼ければなんでもいい Windows7で簡単にユーザーフォルダ名を変更する方法
リスクありそうなので、自己責任でお願いします!
2.初期設定
Google Cloud SDKのインストールと認証の設定について - TASK NOTES
出来たショートカットから起動。

以下赤字が私が入力。
インストール後にCloudSDKを初期化する。
>gcloud init
Pick configuration to use:
[1] Re-initialize this configuration [default] with new settings
[2] Create a new configuration
Please enter your numeric choice: 1
どの構成か選べ…?初期構成の最初期化の「1」を選択(英語能力は底辺)。
Choose the account you would like to use to perform operations for
this configuration:
[1] 【自分のGoogleアカウント】@gmail.com
[2] Log in with a new account
Please enter your numeric choice: 1
ログインを求められるので、「1」と入力し、次はプロジェクト選択しろと言われるので、プロジェクト選択。
Do you want to configure a default Compute Region and Zone? (Y/n)? y(nでも良かったのかも。変更したかったわけじゃないし。
デフォルトのリージョンまたはゾーンの変更 | Compute Engine ドキュメント | Google Cloud
)
Which Google Compute Engine zone would you like to use as project
default?
If you do not specify a zone via a command line flag while working
with Compute Engine resources, the default is assumed.
[1] us-east1-b
[2] us-east1-c
~~~以下リージョンがズラズラ
Please enter numeric choice or text value (must exactly match list
item): 1(上述と同じところを選ぶ)
Your project default Compute Engine zone has been set to [us-east1-b].
You can change it by running [gcloud config set compute/zone NAME].
Your project default Compute Engine region has been set to [us-east1].
You can change it by running [gcloud config set compute/region NAME].
Created a default .boto configuration file at [C:\Users\sato\.boto]. See this fi
le and
(略)
3.SSH接続
で、次にSSH接続してみる。
>gcloud compute --project "【プロジェクトID】" ssh --zone "us-east1-b" "instance-1" --ssh-flag="-p 【ポート番号】"
WARNING: The PuTTY PPK SSH key file for gcloud does not exist.
WARNING: The public SSH key file for gcloud does not exist.
WARNING: The private SSH key file for gcloud does not exist.
WARNING: You do not have an SSH key for gcloud.
WARNING: SSH keygen will be executed to generate a key.
This tool needs to create the directory [C:\Users\【ユーザ名】\.ssh] before
being able to generate SSH keys.
Do you want to continue (Y/n)? y
ERROR: gcloud crashed (UnicodeDecodeError): 'ascii' codec can't decode byte 0x82
in position 0: ordinal not in range(128)
If you would like to report this issue, please run the following command:
gcloud feedback
To check gcloud for common problems, please run the following command:
gcloud info --run-diagnostics
もう一回やると
>gcloud compute --project "【プロジェクトID】" ssh --zone "us-east1-b" "instance-1" --ssh-flag="-p 【ポート番号】"
Updating project ssh metadata...|Updated [https://www.googleapis.com/compute/v1/
projects/branchesproject-gce].
Updating project ssh metadata...done.
Waiting for SSH key to propagate.
plink: unknown option "-p"
ERROR: (gcloud.compute.ssh) Could not SSH into the instance. It is possible tha
t your SSH key has not propagated to the instance yet. Try running this command
again. If you still cannot connect, verify that the firewall and instance are s
et to accept ssh traffic.
あれ、ポート番号指定の方法(後述参照)が違う??「-p」なんて知らない言われてるよ。あと、SSH keyもないって。で、UnicodeDecodeErrorはascii文字じゃない字(日本語とか)が入ってると出るエラー。
Google Cloud Platform - OSS ERP Compiere Distribution Lab
コンソール>Compute Engine>メタデータ>SSH認証鍵を確認。

おほう…まさかの…ローカルPCのユーザ名(日本語)が残ってるよ…
上述で変更したけどね、プロファイルのユーザ名変更する前にgcloud initしちゃったのよ…それのせいかな…
あとローカルPCの\\ユーザフォルダ\.ssh\google_compute_engine.pubの中身見たら、ユーザ名(日本語)が文字化けしてるわ…
google_compute_engine.pubの文字化けをユーザ名(英数)に修正し、VMインスタンスの方も日本語入ってるSSH認証鍵は削除して、ユーザ名(英数)の方のSSH認証鍵を追加。
で、今度はポート番号消して
>gcloud compute --project "【プロジェクトID】" ssh --zone "us-east1-b" "instance-1"
あ、進んだ。で、コネクションエラー出てPuTTYの真っ黒の画面だけになった。
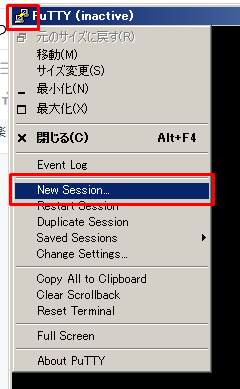
PuTTYの左上のアイコンクリックして「New Session」を選択。
VMインスタンスの外部IPアドレスとポート番号入力して接続。
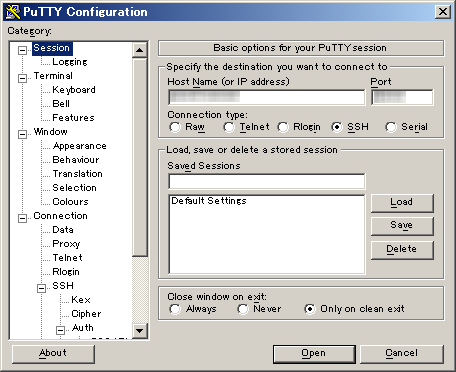
次に下記画面のSSH認証鍵の設定で、プライベートキーをローカルPCの\\ユーザフォルダ\.ssh\google_compute_engine.ppkを選択。

うーん、またエラー…
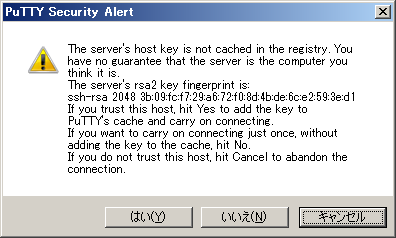
(PuTTYユーザマニュアル) 2.2 ホストキーを検証する(SSHのみ) - 2.2 Verifying the host key (SSH only) - いろいろ解析日記
警告してくれてるだけでそのまま進めてもいいよう。「はい」を選択。
ユーザ名を聞かれるので、ローカルPCのユーザ名を入力。

Authenticating with public key "ローカルPC名\ユーザ名(日本語)@PC名"
……!!!!!!!!!?????????????
まだ付いてくるかユーザ名(日本語)ーーーーーーーーーーーーー!!!!!
どうしたらいいんだ…あ、上述のローカルPCの\\ユーザフォルダ\.ssh\google_compute_engine.ppkにユーザ名(日本語)が文字化けで書いてある…しかし直すとログインできない…( ;∀;)とりあえずほっとく…
【閑話休題】gcloudでSSH接続の試行錯誤(未解決)
ブラウザからgcloudコマンドでSSH接続したくて、VMインスタンスにrsaの公開鍵を登録した話(解決せず)
gceにローカルからgcloudで接続できなくなった場合、そうubuntuで。 - Qiita
で、この内容をコピーしたかったけど出来なかったので、vimの設定を変更
vim様でクリップボードにコピーできるようにする - Qiita
vimの状態見てみると、「-clipboard」となっておりクリップボード利用できない。
バージョンが悪いらしいのだが、設定ファイル編集で出来るようなのでそれで進める。
$ vim ~/.vimrc
これで設定ファイルが作成された状態。
これで以下を追記。
--------------------------------------
" 行番号を表示
set number
" クリップボードの有効
set clipboard=unnamed,autoselect
--------------------------------------
もう一回確認。
うぬ。まだ「-clipboard」…でもコピー出来るようになったのでよしとする。
しかし無効な鍵ですと言われたので、改行や余計な空白を削除してから登録、保存。
$ gcloud compute --project "【プロジェクトID】" ssh --zone "us-east1-b" "instance-1" --ssh-flag="-p 【ポート番号】"
しかし結局アクセスできず…
元に戻しました…
Ruby関連の言葉(ツールとか)おさらい
さて、Railsアプリを作成…といきたいが その前に…
Ruby関連のツールついて
めっちゃ簡単にまとめてみる。
Rails
Rubyのフレームワーク。Rubyを開発しやすくする枠組み。一番人気かつ多用されている。
Ruby on Railsとは?超初心者でも分かる噛み砕いた解説 | 侍エンジニア塾ブログ | プログラミング入門者向け学習情報サイト
Git
ファイルの変更履歴などを記録するバージョン管理ツール。
「そもそもGitって何?」、「GitとGitHubは何が違うの?」にシンプルに答えるよ-Six Apart ブログ|オウンドメディア運営者のための実践的情報とコミュニティ
Gem
Ruby用のライブラリ管理ツール。ライブラリとは一から自分で作るらんでも特定の機能を部品化してそれらをパッケージしてくれたもの、かな。最近はRubyインストールと一緒についてくる。
Ruby on Rails 初心者必見!パッケージ管理ツール『gem』を徹底解説 | Tech2GO
Bundler
Gemは好きなライブラリを個別にインストール出来るけど、こいつとこいつは相性悪いとか互換性の問題が出てくる。そんなとき、互換性を保ちながら管理してくれるのがBundler。なんていいやつ!仲人さんですね。
rbenv
複数のRubyのバージョン管理ツール。バージョン切り替えを行うことができる。
「Rubyを始めよう!・・・・rbenv? gem? rvm?」 - Qiita
Passenger
Railsアプリを実行するためのApache及びnginx用のフリー・モジュール。
Apache及びnginxはサーバーで、そのままではRailsアプリ使えないけど、Passengerで使えるようになる。
RailsをApache上で動かすためのモジュールPhusion Passenger - モンテカットの開発日記
ApacheとNginxとPassengerとUnicornの違い【すごい初心者向け】 - ふじいけ技術メモ
Apache上でRuby on Railsアプリケーションを動かす/Passenger(mod_rails for Apache)の利用 — Redmine.JP
Unicorn
Railsなどで作られたアプリを動かすためのアプリケーションサーバ。デプロイ時のダウンタイムがない。
Railsを動作させるアプリケーションサーバunicornとは?概要やnginxとの違いなど | Simplie Post
ApacheとNginxとPassengerとUnicornの違い【すごい初心者向け】 - ふじいけ技術メモ
ここらへんをばちこんってGCEに入れていければと思ってます。